

Metroid: Samus Returns is full of boss battles against a real swarm of Metroid evolutions — those weird floating alien jellyfish change forms constantly as you explore the depths of planet SR388. Not only do the forms completely change, but each type of boss actually evolves as Samus travels deeper and deeper. The bosses gain new abilities, and it can get pretty tricky keeping up.
After the events of the original Metroid, this remake of Metroid 2 sends intergalactic bounty hunter Samus Aran back to the planet SR388 to wipe out the last of the Metroids. These deadly creature pose a risk to the galaxy, and there are less than 50 total left. That’s still a whole lot of aliens to exterminate. Learn all the best strategies for dealing with these buggers with the boss tips and tricks below.
How To Beat Every Metroid Type | Boss Guide
As Samus, your primary goal in Metroid: Samus Returns is hunting the many different types of Metroid. Each one fights differently, and it helps to enter a fight prepared. Here, we’ll break down how to defeat each type of Metroid evolution you’ll encounter as you wipe out the last remaining aliens.
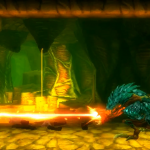
Alpha Metroid
The first evolution of the Metroid is the easiest, but it can still take Samus by surprise. It attacks by moving around the battlefield, dropping energy pellets and swooping in for a charge attack. The Metroid will flash briefly before charging — use your Melee Counter right as the Metroid swoops in.
To damage Alpha, chase it (or use free-aim) and shoot missiles into the exposed soft part of the belly. You’ll also hurt it after using the Melee Counter, briefly stunning Alpha and leaving it open to attacks. Use rockets here too — after countering, a barrage of rockets will often kill the Metroid in one burst.
If you’re low on health, shoot the energy pellets the Metroid drops between charge attacks. Shooting the pellets will drop extra rocket ammo and health.
Area 1: In Area 1, the Alpha Metroid will electrify its body before charging. Use the Ice Beam to freeze it, or wait for it to attack several times and lose its charge. Don’t try to melee counter when it glows blue — you’ll take damage.
Area 2: The Alphas change slightly in Area 2. They’re more powerful, tougher to kill, and glow orange when they charge. Instead of small pellets, the Alphas will drop a large energy charge that electrifies the entire platform. Charged Ice Beam will stop the orange glow charge, allowing Samus to melee counter.

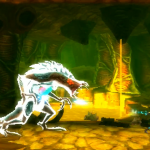
Gamma Metroid
The crawling Gamma Metroid is bigger and badder than the floating Alphas, and comes with a whole lot more moves. Like the Alpha, Gamma will float above the arena and drop pellets you can shoot to collect extra missiles or health.
While in the air, the Gamma will use charge attacks, launch an energy beam diagonally downward, or charge an explosive area-of-effect. When it charges, quickly back off. When the Gamma lands on the ground, it will move toward Samus and attempt to use charge attacks. While crawling, when its mouth charges, it will launch a straight beam that covers the entire arena. If it charges its whole body, it will electrify the floor — jump or get off the current level of platform!
To disable its charged blue aura and enable melee counters, use the charged Ice Beam on the weak point. Hitting the floating Gamma with ice will cause it to drop to the ground. Let it get close and charge attack so you can melee counter and blast its weak underbelly. You can also shoot its face when it’s on the ground, it does less damage but will hurt it. If it’s almost dead, it’s a great way to finish it off.
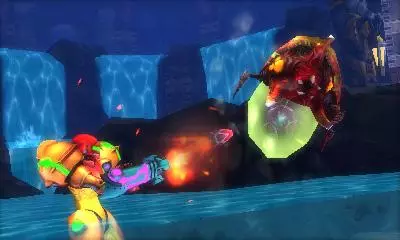
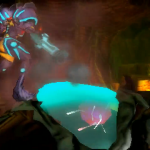
Chozo Imposter
The Imposter is first encountered in Area 2, in the Chozo Temple ruin where it pretends to be a statue. This random alien uses its super-hard outershell, rolling around the arena, bouncing, and trying to damage Samus with a variety of launching attacks. When it isn’t spinning uncontrollable in a shell, it will slam the ground or launch a wave attack.
There’s no way to melee counter this thing, and you won’t find any extra health or ammo here. Unleash rockets on the imposter alien when it unfurls from a shell, jump when it bounces and rolls, and avoid the incoming fireballs or energy waves. When it charges up, run to the opposite side and avoid the area-of-effect attack.
Defeating the Chozo Imposter rewards you with the Spring Ball.
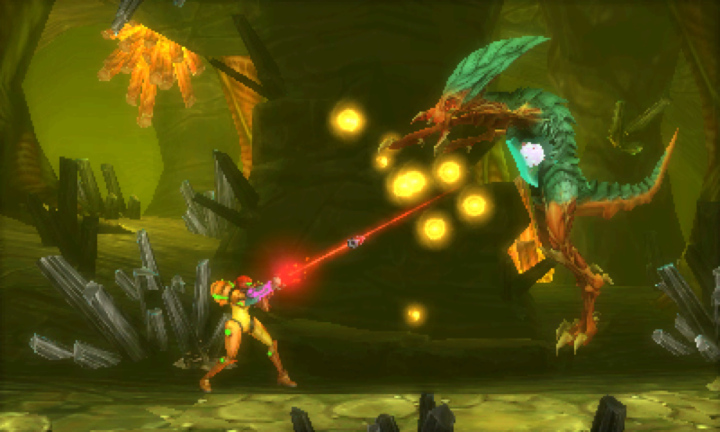
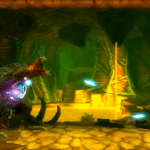
Zeta Metroid
The large quadraped Metroid is found in Area 4. It stays on the ground, crawling on the walls and launching energy blasts from its jaws. You can’t ice the creature with a charged Ice Beam, so don’t even bother — switch to missiles and fire when it rears back to spit projectiles.
When it crawls on the ceiling, you can’t hurt it — prepare and swap to the Grapple Beam. When a red spot glows on the Zeta’s back, grab it with the Grapple Beam and pull Zeta down to stun it, allowing you to really hurt it.
Use your Space Jump to stay mid-air and avoid the flame attacks. While on the floor, the Zeta will launch three projectiles in a row and track Samus. Dodge with Space Jump to avoid the attacks — if you really want to hurt the Zeta, just wait until you can pull the Zeta down from the ceiling with your Grapple Beam. Don’t pull from directly below either or you’ll take damage when the Zeta hits the floor.

Omega Metroid
The most powerful form of the Metroids appears in Area 6. When Samus reaches the boss arena when backtracking through the area with the lowered poison, the Omage Metroid will attack. This powerful bruiser uses a variety of killer attacks, and shields its weak point with a hard shell.
The Omega uses a sustained fire beam that hits all the way across the arena. It will aim at Samus sometimes and fire while tracking — or it will lowers its head and fire forward with the beam close to the ground. It will also sweep its beam from top to bottom or bottom to top — use the Space Jump to jump over the Omega’s head to avoid the fire when it attacks from bottom to top. When it’s top to bottom, roll into the Morph Ball and go under the Omega.
The Omega will also claw or swing its tail, using a simple telegraph with the tail or raised claw. Sometimes, the Omega will summon rocks from the ceiling. When this happens, shoot the falling rocks to collect extra missiles or health.
To fight the Omega, aim for the mouth for small damage, and get close to the create so you can shoot up and into the ribcage. It only take a handful of rockets straight to the chest to cause the Omega to recoil and the armor to shatter.
When the weak point is exposed, stay close to the Omega and wait for it to use a bite attack. Wait for the flash — then use a Melee Counter. Swap to Super Missiles for insane damage. It’s the only way to really bring down the boss’ health fast. It takes some practice to get the melee counter timed right, but it’s worth learning.
Dodge attacks and attempt to shatter the ribcage. The boss will only use its Melee Counter attack after the ribcage is destroyed. Stay close and try to bait out those counter-able attacks. If you can manage to get two, this hard fight is over.
Metroids
In Area 8, Samus will encounter standard life-sucking Metroids. To defeat them, use the charged Ice Beam to stop them, then blast them with missiles. Enough hits will take these creatures out.
If a Metroid latches onto Samus, enter Morph Ball mode and set bombs or a Power Bomb to get free. There are 10 regular Metroids total.
Metroid Queen
The massive Metroid Queen’s only weak point is it’s wide, open mouth. There are multiple chances to shoot the maw, but you’ll have to survive its many, many special attacks.
Phase 1:
The Queen fires a deadly beam of energy that leaves behind a burning aura on the floor or ceiling. It starts on the floor — space jump in the corner, and wait for the ceiling beam. You’ll be able to drop down as the floor energy dissipates and shoot the Queen in the mouth as it completes the attack.
If purple waves appear, the Queen is about to lunge forward. Retreat to the back and shoot the mouth while it’s open. If it flashes again, quickly jump before the Queen slams its head on the floor.
Keep shooting the Queen in the mouth until it’s stunned. After stunning the Queen, get close and continue to shoot at the open mouth — stand very close, and it will attempt a bite attack that Samus can melee counter. A successful melee counter leads to a flashing red grapple point. Grapple and pull the head down to stun it — stand back and shoot! The Queen will bite anyone standing near its mouth.
Phase 2:
Here’s where things get tough. The Queen will glow green and launch floating energy balls all over the arena before firing its energy beam. This time, switch to the Morph Ball and cling to the walls to escape. If you use Space Jump, you will hit those green energy balls.
The creature will also blast the back wall then roar, pushing Samus toward the damaging back wall. To escape this attack, enter your Morph Ball and cling to the floor while moving left.
Like the first phase, when the Queen is stunned, wait for the melee counter then grapple and blast. Use the enhanced super-fast Aeion power to shoot faster. Your regular weapon will hurt the Queen too.
Phase 3:
The Queen will begin mixing powers. Save your Aeion energy for this phase. Whenever the creature opens its mouth, use Super Missiles or Aeion to stun it as quickly as possible.
Instead of following a simple pattern, the Queen will use a variety of attacks, mixing and matching — she’ll use the fire-breath with the poison bubbles. She’ll bite at almost any point, and will slam her head on the ground if you’re near her.
Use your Super Missiles for this phase. You won’t have many chances to hit the mouth — when she glows green, you’ll always be able to get a Super Missile hit. Whenever the Queen backs up, you’ll be able to blast multiple missiles into the Queen’s mouth. For this phase, you need to keep hitting the Queen until she’s stunned — keep going until the boss is finally defeated.
Samus’s adventure isn’t over yet! Check out more guides on Gameranx for help with any of the other bosses in Metroid: Samus Returns.


![20 BEST Games of 2026 [FIRST HALF]](https://i.ytimg.com/vi/y52qPEY6fVY/mqdefault.jpg)
![10 Most DISAPPOINTING Games of 2026 [First Half]](https://i.ytimg.com/vi/RE0VNFNEV9g/mqdefault.jpg)